BLOGGER TEMPLATES AND TWITTER BACKGROUNDS �
Showing posts with label tutorial. Show all posts

Saturday, February 14, 2009

Catching up with a few things…

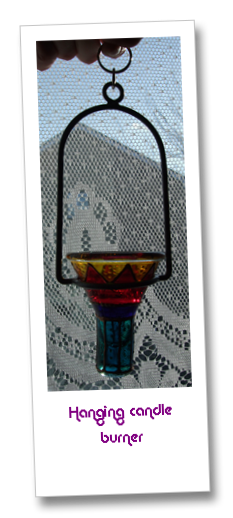
So what did I do with my precious few days of snow freedom? Time from work was spent productively I managed to get all my assignments done for this half term, planned my 1:1 for my ESOL student and still had time to do a few things for me! Some of them were WIP’s that I could finally finish off, some of them were things that I’ve had in my mind for a while and haven’t had time to do. The first was this hanging candle holder which will eventually be going into my eBay shop once I have the time to photograph it properly.
The second was this book bag, using the same concept as the last one that I’d made; fleece for the body of the bag which is stretchy and all cushiony, elastic to wrap round the book and keep the top flap closed and the book all snug and protected.

This one’s a bit wider than the last one and so will hold either thicker or taller books. I love the last one I made and use it all the time. I permanently carry a book round with me for waiting in the hospital or doctors, for the odd quiet minute during breaks or even for waiting in the queues at the post office! In fact the post office clerk laughs at me for taking a book in with me to read in the queue, but it has been known to queue for as long as three quarters of an hours in there!

I roughly sewed a piece of flower trim as a decoration because I thought it went with the blue of the fleece design and I added a yellow bead and matching embroidery thread to pick out the yellow from the flowers. It kind of gives it a handmade look.

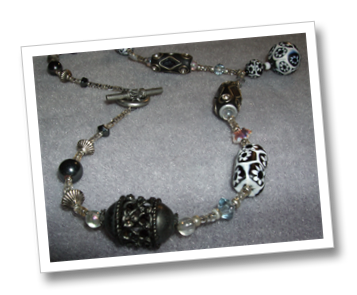
Then feeling the need for a little more prettiness in my life, I finally got around to using some beads I bought ages ago, and incorporating them with some other beads from a necklace that broke ages ago.

The black and white of the dotty beads perfectly complimented the black and white in the flowered beads. I added some red glass beads for spacers to pick out the red in the flowers too and also some black and white spacers too. I love this necklace, the red really makes it pop!

I also found my new favourite way of beading; with my beading square laid over the keyboard  whilst I watch something on my laptop. The beading square I use is a very textured fuzzy fabric which stops the beads rolling about.

Okay, so I was on a roll then and reconstructed another necklace which I also now adore. Do you do that with jewellery? Reconstruct it when you’re bored of it?

This one has these cute millefiore flowered beads in black and white, with some Indian mirrored tube beads and some filigree antiqued metal beads. So now I have another couple of new favourite necklaces to wear; ho hum, where can I wear them to?
What else have I been doing? Well I’ve been making tassels. These will eventually go onto a tribal belt which is definitely a WIP and is currently a pile of tassels and a fabric strip, so I’ll show you more pictures when it’s a little complete.

I gave my 1:1 lesson yesterday to my ESOL student. It’s part of my TESOL requirements and I thought it went really well. I decided to concentrate on definite and indefinite articles as my student is a Farsi speaker and Farsi doesn’t have articles, it’s something I noticed she was weak in. At first I thought I’d pitched it too simply but then it became apparent that it was okay, she was confused about the whole articles business and she really learnt from the lesson. Hurray! Now to evaluate and document it all. I’ll have plenty of time though as I’m now on half term! Double hurray! A week off!

I just thought I’d show you what M gave me this morning – a dozen red roses! Aren’t they lovely? We’ll be popping out later for our Valentines outing which will be a romantic trip ice-skating! Um..did I say romantic? Is falling on your arse romantic? Probably not, but it’ll be great fun and we’ll have a romantic candlelit meal later on tonight. I promised to cook him steak and chips as his Valentines gift. That’s definitely the way to M’s heart! I must be mad though, ice-skating in this weather? All we really need to do is to try walking on the footpaths round here which are about two inches of compacted ice and absolutely treacherous! We walked my friend home last night and nearly went over numerous times! It seems that England is nearly out of road grit and so is not bothering with non-essential roads, nor footpaths. The long term reports predicted a mild winter, so most councils didn’t stock up enough. This cold snap from Siberia has caught everyone on the hop!

I hope your Valentines day brings you romance and fun!

Tuesday, April 01, 2008

More Swap spoilers...(Tanza)

While crocheting some of the 12 inch squares for my sisters Christmas blanket, I kept getting a sense of deja vu. I was getting some fresh bedding out the other day and I suddenly realised why. I made this blanket over 10 years ago. It was the reason I learnt to crochet! At the time, M and I were living in a house with no heating, so blankets were oh so necessary! It's only acrylic, but it's as fresh and bright as the day I finished it! I threw it on my bed because it's still getting a little cold at night and the girls do love a blanket on the bed to sleep on.


This is a tiger lily hair clip I made at the weekend for PurpleHeather's swap package! (I remembered to take photos as I was going along so I could do a quick tutorial. ) I plucked the silk flower from the plastic stem and hot glued it to some copper wire.

I made sure to tuck the end of the wire into the hole where the stem had been and liberally glued it.


Then I covered the glue with some florists tape. It's a semi tacky tape which is almost crepey in texture, you pull it slightly to activate the tackiness, then pressed it into place.


I snipped the wire off leaving a good length, and wrapped it through the decorative holes of the clip.


Using some fine wire, I wrapped a few sequins and beads to the clip as well, and finally some ribbons.


And using a textile glitter glue pen, I applied glitter to the flower for some sparkle!

Another swap, another partner. this one will be going across the world to Australia. My partner Tanza loves dragons so hopefully this will fit the bill. I just need to finish painting it.

I've also made this goddess pendant for her. I'm so pleased with this; it came to me Sunday night in a dream, and I made it Monday evening. Blue is Tanza's favourite colour and I wanted this to look turquoise. I may paint the spiral silver to accent it. I found a tiny piece of heart shaped sodalite which I put on her head. She came out just the way I envisioned her. She has a hole for some thong at the top where her 'hands' meet in prayer position over her head.

Can you tell what she is? She seems so clear to me, but I just wondered what everyone else thought. I made another one in purple with an amethyst stone. I haven't fired them yet, that's a job for tomorrow.

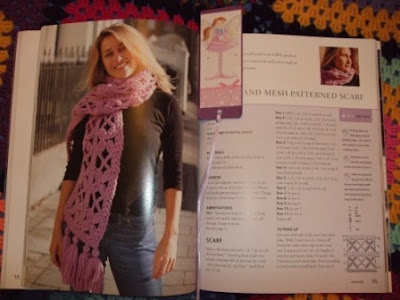
Remember Sunday night I was off to watch a Terry Gilliam film with M (on DVD), well, it was Tideland, a film which is compelling and disturbing at the same time. As he says, he found his inner child in the making of this film and his inner child is a little girl. Anyway, I find it impossible to just sit and watch the TV, so I started this Flower and Mesh Patterned Scarf.

As I didn't have the ginormous yarn required for it, I cast on in regular DK yarn (I think that's sport weight to you in the US). I imagined that it would drape a little better and be less cumbersome. It's not as long as I'd like, but it might get longer when I'm finished and tassels are added. I like that it's a simple black that will go with alot of things.

And I got a phone today! Hurray! My old phone drowned at the Sealife Centre last Friday, not in a spectacular incident involving the roping together of a pair of sea turtles, because that would mean Captain Jack was around somewhere and believe me, if Johnny Depp was hanging around, the last thing I'd be worrying about would be my mobile phone *lol* Anyway, my phone drowned in my bag when a bottle of water leaked. Luckily I found the same model online very cheap :-) I put my old Sim card in and my memory card and I have all my photos and mp3 tracks at my fingertips again. Hurray! It actually arrived yesterday, but as there was no-one in, the courier took it to another town for the night! :-( M went and picked it up on his bike for me today!

I love my pretty little phone!

Friday, July 20, 2007

Sew tired of waiting.....

So as you might know by now, on a bad night, I'm an insomniac and on a good night, I'm a very light sleeper who wakes at any sound or light. I quite often use a sleep mask to stop myself waking at dawn in the summer, or when I'm camping. This is one I made for myself last year, inspired by Phizzychicks Owl Eye Mask. The BF jokes that he feels likes he's waking up next to a muppet. *lol*
Anyway, the Summer holidays have given me plenty of time to play around and I decided I needed a new eye mask, so just for fun, I made myself a cat mask. I thought the BF might prefer waking up next to cat woman than a muppet!
It's a bit bigger than my other one so hopefully will eliminate those annoying chinks of light that manage to get in. It's also made from a lovely soft black velvet lined with satin, so it feels really nice to wear and is a little cooler than the owl corduroy one.
Here's how it's made.
You will need:
A piece of paper to make your template with, a pencil, a piece of velvet outer material, a piece of smooth lining material that will feel nice next to your sensitive eye skin, a small length of medium width elastic, some pink and gold felt, scissors, pins, a needle and some sewing thread.
I sketched a rough shape onto some paper, then cut it out and adjusted the shape by holding it up to my face and cutting accordingly. When I was happy with the template, I laid it out onto some velvet and satin and cut one piece out of each fabric.

Then I cut the eye shapes I wanted from gold felt, and the ear pieces from pink felt.


Make sure you cut out two of each shape.


I sewed the felt onto the face and added some thread whiskers and a little chain stitch daisy highlight in each pupil.


I attached the elastic where I wanted it to be (making sure that the wrong side of the front is on the inside, then the elastic, then the lining) and using a running stitch, sewed all around the outside of the mask MAKING SURE TO STOP BEFORE THE TOP OF THE LAST EAR! If you don't stop here, you won't be able to turn the mask the right way out again. Turn it right side out again. You should now have the velvet on the front, the lining next to that, and the elastic running round the back. You will still have a gap of unsewn material along the top, which you can now sew up. I used a whip stitch to sew up that last little bit and carried it on all around the edge of the mask to neaten it up.

Your mask is now ready to wear!

The last Harry Potter book is due out tomorrow. I'm much more excited than I probably should be and have set aside the whole weekend to read the book. I received this lovely handmade journal in a personal swap last year but wasn't sure what to use it for. Last night I decided to start a book journal and this journal was the perfect thing for it. It came to me with the word JOURNEY on the front which seemed a perfect description for the literary journey I wanted to record.

So in anticipation for the Harry Potter book I made a start.


In it I plan to record the books that I read with an account of my thoughts on it, drawings and illustrations and stuff like that. A kind of literary art journal if you like! I do love to read.

Thursday, November 16, 2006

Winter Spice Pinecones Tutorial!

One of the nicest things to do at this time of year is to make some Winter Spice Pinecone Decorations. To do this, you take a walk in your nearest woodland area and collect some pinecones. Spread them out on a bag and spray them with metallic spray paint. For mine, I used a mixture of gold and copper. Make sure you do it in a well ventilated area. I did mine in the garden. When they are dry, spread some PVA (white) glue onto a palette and dip the ends of the cones in. You don't need too much glue on each one. Sprinkle with some glitter (I have used gold) and allow to dry. When they are dry, pop them in a plastic bag and sprinkle a few drops of essential oil in to create the winter spice smell. I normally use cinnamon, clove and orange oil, but I guess pine would be nice too! Shake the bag to spread the oil and Voila! Some seasonal pot pourri that won't break the bank. I use them as table dressing for Christmas Craft Fairs, as gifts for friends and piled high in a bowl as nice smelly room scenters.

About

Labels

101 (2) ABC (4) art (7) ATC's (1) Baking (12) bath (3) beads (30) belly dancing (32) Birthday (22) Books (17) candles (3) Chinese New Year (4) circus (1) clothing (34) crafts (177) crochet (102) crystals (2) Drawing (5) eco (8) family (31) felt (25) festivals (10) fimo (14) friends (29) gaming (15) garden (24) Geocaching (1) Glass (25) Harry Potter (18) Holiday (42) hula hooping (2) jewellery (58) knitting (76) Meme (3) nature (14) needle felting (10) new year (5) Painting (19) papercrafts (18) Pets (33) photography (37) ravelry (15) reconstructed (14) resin (2) school (22) sewing (75) shop (4) soaps (8) Spinning (8) stamping (2) stencilling (1) swaps (68) tattoos (1) TESOL (23) tutorial (4) Walks (15) weather (23) wire (1) yoga (6)